Garden Tuesday : Fall Outdoor Lunch, Bistro Style
I said it last week and I am saying it again. I love fall. It is a wonderful time to sit on the backyard deck and lounge away a afternoon doing nothing more than enjoying New England in the fall. You can take in deep breaths of the crisp air and bathe in the colors of the sunshine filtering through the autumnal leaves. Toss in a simple lunch of sandwiches and salads with soda and you have the makings of the perfect way to waste away the day. And waste away a day in just this fashion is exactly what we did over lunch this past Saturday.
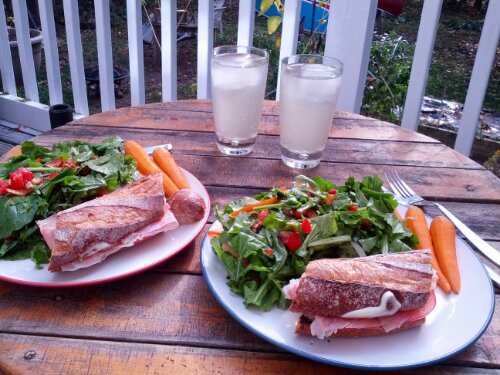
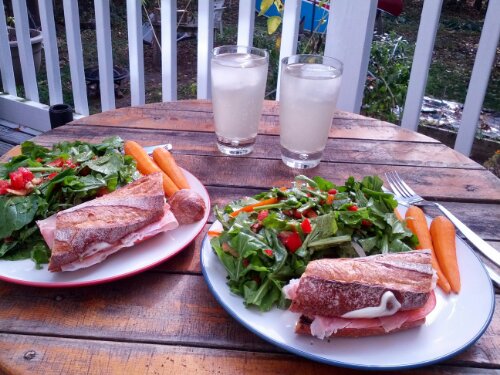
Of course, my newly acquired training in the culinary arts has elevated my expectations of simple lunch fare – especially if I am making it. So, Saturday’s waste-away-the-day-dreaming-in-yellows-oranges-and-reds simple lunch consisted of a garden greens salad tossed in a lemony vinaigrette, a pesto, prosciutto, mozzarella and black garlic butter baguette sandwich and a homemade mint-lime soda on ice. And it was amazing.

Another outcome of my culinary arts education so far has been our ability to use up all of our CSA and garden vegetables. With so much tasting, testing, sampling and eating in class, I find my evening appetite to be non-existent. I get home and am ready for a shower, PJs and some relaxation. Poor Oivind has to suffer through tales of culinary feats in the classroom such as French Bistro day. That day we made made classic steak frites with a fresh, lemony bearnaise sauce, a Croque Madame using thin sliced ham and Compte between a beautiful homemade Pain du Mie topped with a nutmeg-y Mornay Sauce and a fried egg, a oyster mushroom, brussel sprout, butternut squash gnocchi finished with a lemon-brown butter sauce and, finally, snails baked in black butter and topped with Pain du Mie croutons. And I do this four days a week, oh my! How can I possible eat dinner too?
Fortunately, I also get enough take home leftovers to feed a college fraternity, so he is not totally left out of the indulgences. Albeit cold and well-traveled on the subway indulgences. So, as I was saying, our CSA vegetables and garden vegetables just don’t get consumed as quickly as in years past. Come the weekend, we take on the challenge of making a dent in our stockpiles. It is a good thing we are getting to the fall where hardy greens can survive a week or more and more storage crops are appearing in our weekly share. Culinary school is only 14 weeks, so we will have a full larder (or cabinet and basement shelves as our case may be) this winter.
This also gives me ample opportunity to practice some of the techniques I am learning in class, which is why our simple lunch got a little less simple. It all started on Friday.
Friday, I stopped by Dave’s Fresh Pasta in Davis Square. Granted, I was there for a bottle of Gruner Veltliner. The Gruner is awesome, by the way. And, it comes in a 1 liter bottle with a pop top, even more awesome. While grabbing said liter of wine, I also grabbed a quarter pound of super thin American prosciutto and a mini baguette. I actually didn’t, have sandwiches in mind at the time. I was thinking more along the lines of charcuterie with slices of baguette smeared in the leftover black garlic butter from French bistro class. If you don’t know what black garlic is, just know it is super yummy. Maybe some future post will explore this particular culinary phenomena.
Come Saturday, my desire to practice the culinary arts got the better of the original plan. I did indeed use that black garlic butter and, I did, in fact, smear the baguette with it – half with black garlic butter and half with the basil and pine nut pesto. That was from the final harvest of herb a few weeks ago. I toasted that with slices of fresh mozzarella until it was bubbly. Once out of the oven, the sandwiches were finished with tomatoes and the prosciutto.
After I had gone so far with gourmeting up the sandwiches, I couldn’t just dress the pile of arugula from our last CSA share with a drizzle of vinegar and olive oil. I needed to practice emulsification by whisking together white wine vinegar, lemon juice and olive together with finely diced red peppers, shallots and sun dried tomatoes. All topped with the last of the garden tomatoes and a side of fresh fall carrots.
To tie this lazy-fall-day-bistro-lunch-on-the-deck together, I opened the mint-lime soda that I started last week. Seven days of fermentation was the perfect amount of time to achieve a fizzy, refreshing finale to the lunch. Alas, I also found another use for the herbal infused syrups I made last week. Soda! Yet another reason to love fall.
Mint Lime Soda
This recipe requires a clean 2 liter soda bottle for this. The yeast is used to create carbon dioxide for fizz; thus, pressure will be created in the bottle. For this reason, a plastic 2 liter bottle is safer than glass. Glass only recommended if you are using champagne bottles with wired corks and if you have this capability, then you’ve probably progressed well beyond this simple recipe Think of this as a way to directly recycle your plastic bottles!
1 C 1:1 Mint Syrup
1/2 C Sugar + 1 T (to hydrate yeast)
1/8 t Champagne or ale yeast (available at your local home brewing store or by mail). Regular yeast may be substituted, but your soda may have a mild bread aroma and taste.
Juice from 3-4 limes or 1/2 cup bottled lime juice
1/2 t salt
1 cup warm water (70-80°F)
Enough water to top off bottle
All ingredients can be adjusted to your taste. I like a less sweet, drier, saltier soda, which is an acquired taste especially if you are used to those high fructose corn syrup concoctions prevalent today. This is a fun way to experiment and get yourself a custom designed soda.
1. Hydrate the yeast – Stir the 1T Sugar into the warm water. It is important the water is not too hot or the yeast will die. Set aside while preparing the other ingredients.
2. Prepare the soda – Funnel syrup, lime juice, salt and 1 cup sugar into the two liter bottle. Fill the bottle 3/4 full with water. I prefer filtered water that has stood open for a few hours so any chlorine has evaporated away. Cap the bottle and shake to dissolve the sugar and salt.
The sugar and salt may be dissolved and the chlorine evaporated by heating the mixture on the stove. If this method is used, the mixture must be thoroughly cooled to 70-80°F before adding yeast.
3. Adjust flavor – Once the sugar has sufficiently dissolved pour a sample and taste. The recipe as written is fairly mild since additions are easier to make than subtractions. Add more sugar, salt, syrup or juice according to your preference.
Tasting notes : The sweetness will mellow slightly from the yeast consuming some sugar, but over a week this is only a slight adjustment. Dissolved carbon dioxide in water makes the water slightly acidic. This will make flavors sharper after carbonation. The aromatic effect of the fizziness will also change the flavor after carbination. The flavors, especially the saltiness, will be more pronounced after carbonation. The liquid will also be further diluted in Step 4 to fill the bottle.
Something I am terrible at doing, but good at advising is to keep notes on quantities of additions and flavor descriptions to help guide future recipes. I, however, enjoy living adventurously (read: I am lazy) and will be surprised at the character and uniqueness of every batch.
4. Add the yeast – Check the yeast mixture. It should be a little frothy indicating the yeast is hydrated and active. If not, stir vigorously and give it a few more minutes. If there is no froth after 15 minutes, the yeast is probably dead and a new batch is needed. Funnel the frothy mixture into the bottle. If necessary, add more filtered water until the bottle is filled 2-3 inches below the top edge of the bottle.
5. Ferment – Cap the bottle tightly and sit it in a room temperature space. Do not refrigerate. The yeast will go dormant or slow down carbon dioxide production in a cold environment.
Over the next week, invert the bottle once a day to mix and check the firmness of the bottle. The bottle should get noticeable firmer after a few days indicating the internal pressure is increasing and the yeast is doing it’s job. If the bottle doesn’t firm up in 3 days or if you see a layer of yeast floating (look for quantities nearing 1/8t or much more than a few grains), the yeast are not doing their job and you will probably have to start over or try adding a new batch of hydrated yeast.
6. Refrigerate – After about a week, the bottle should be firm and it can be refrigerated.
7. Open – You caution when opening. There is likely a lot of fizz in that bottle. Personally, I have bathed in soda on several occasions. Like Champagne and sparkling wines, refrigerating is essential to minimizing the explosive rush of carbon dioxide trying to escape!
For many more ideas on making soda at home, I recommend checking out Emma Christensen’s book True Brews, but once you are hooked, you’ll probably be off making you own creations before long and won’t need formal recipes.
One Comment
Again, very interesting and looked really great too. Sounds like you are really enjoying this new endeavor!